A few days ago, I took us all back to basics with a post on trimming Half Square Triangles. Except, right in the middle of it I taught you how to cheat! The cheat instructed you how to trim HSTs without rotating for every side, essentially saving a little bit of time by cutting two sides at a time and only rotating the piece once between the second and third trim.

I did include a warning regarding the danger of the method, as its more likely to result in losing control of your rotary blade. What’s the worst that could happen, you ask? Well you could accidentally slice into the piece you are trying to trim, rendering it useless. Or even worse, you could accidentally cut yourself. Trust me, I have done it and I’ve seen other skilled quilters and sewers do it as well.

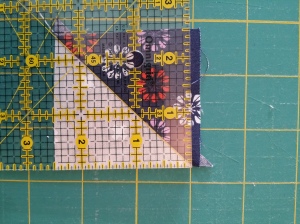
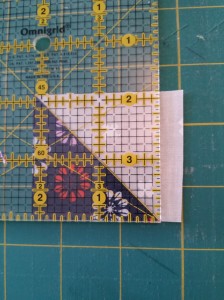
Today, I would like to redeem myself as a teacher, and show you the safest way to trim HST. So, let’s try again, this time without cheating. Imagine you have already pressed your HST and you are all set to cut. Once again, you will align the diagonal line on your cutting ruler with the diagonal seam, careful to protect (under the ruler) more than what is needed for your final dimension. I always start with my diagonal running from lower left to upper right ( like a forward slash / ). You make the first cut.

HST Trimming

The first cut will trim the excess grey fabric to the right of the ruler using the / diagonal.

Then rotate 90 degrees clockwise, realign the ruler with the diagonal running from upper left to lower right (like a back slash \ ). Once again you will cut on the right side of the ruler. Notice that the first cut now aligns perfectly to the bottom edge of the ruler and the diagonal points directly to the corner. Make your second cut.

HST Trimming

The second cut will trim the navy floral using the \ diagonal

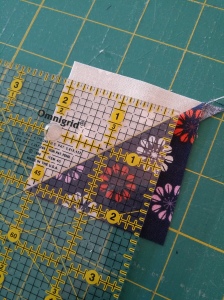
Once again rotate the fabric 90 degrees clockwise. This time you will align the diagonal ( / ) as well as the left edge of the fabric with your final cutting dimension. So in this case, I aligned the left edge at 2 1/8″. Make the third cut.

HST Trimming

Ready for the third cut, trimming the navy floral print using the / diagonal

At this point it’s easy to see that you have one side left to trim in order to square the piece at 2 1/8″.

Notce the extra lip of grey fabric past the lower point of the diagonal seam.

Notice the extra lip of grey fabric past the lower point of the diagonal seam.

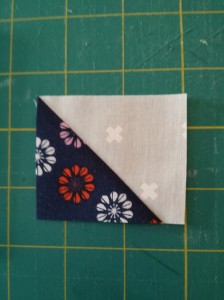
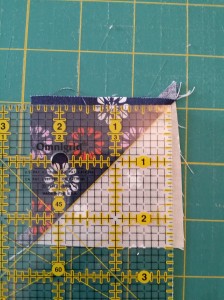
After a final 90 degree rotation, the diagonal ( \ ) alignment should direct your edge alignment to the final cutting dimension. Make the fourth cut.

The fourth cut, after rotating again we are once again using the \ diagonal.

The fourth cut, after rotating again we are once again using the \ diagonal.

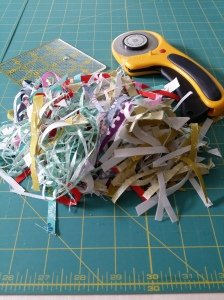
So today’s Back to Basics lesson used exact steps to carefully and precisely trim your HSTs. Again, the additional rotation is a wise move when you are concerned with maintaining control of the rotary cutter and ruler as you will always cut directly away from your body, instead of across the body.

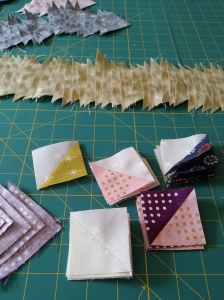
HST Quilt Trimmings
Happy trimming!

Let’s talk about half square triangles (HST). They are so frequently the building block to many of our favorite quilt designs, yet there is a key step that always gets skipped when it comes to blogging. There are at least 3 great ways to make Half Square Triangles, but what people usually don’t mention is how to clean them up so they are useful!
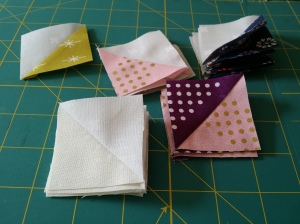
Lovely little (2 1/8") HSTs sewn from Cotton and Steel fabrics.

Lovely little (2 1/8″) HSTs sewn from Cotton and Steel fabrics.

It is a rare day when you don’t need to trim down your HST. Most pattern makers even plan for this to happen so they give you extra room, and when you’re working with a bias seam like you do with HST, it’s better to just forget about the fabric waste. Besides trimming piles are extra cute and fulfilling, not to mention they make great recycled filling for small softies.

So, almost any method you choose to sew them you will end up at a point when your HST looks something like this, isn’t it sad? Like an empty wonton.
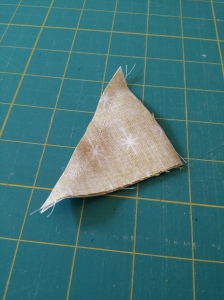
Sad HST pre-pressing and trimming.

Sad HST pre-pressing and trimming.

Head over to your pressing station and give it a little love. Really, make it hot and steamy (cotton can really use a hot steamy iron). I always start by pressing the lighter half first, letting the other half rest on top of the iron for now.
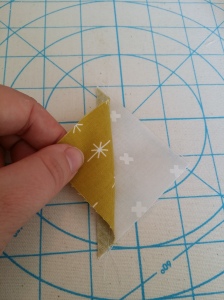
Properly pressing for a perfect HST.

Properly pressing for a perfect HST.

As you iron slowly push the seam allowance towards the darker half, folding it flat beneath the second half of the HST and pressing from the center outwards across the seam.
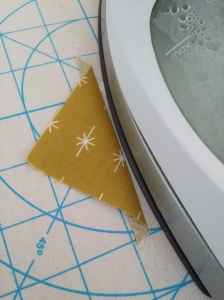
Pressing the lighter half of the HST first, notice the seam allowance is pushed towards the darker half.
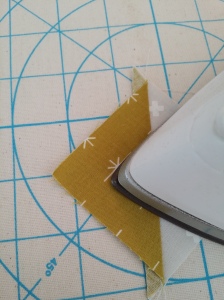
Pressing the lighter half of the HST first, notice the seam allowance is pushed towards the darker half.

Use the point of the iron to slowly fold the darker half flat over the seam allowance, starting in the center, then pushing forward to cover the whole square.

Use the point of the iron to slowly fold the darker half flat over the seam allowance, starting in the center, then pushing forward to cover the whole square.

Remember, you are working with a bias seam, so you want to be careful not to stretch or pull as you iron. Consider laying the seam over a guideline so you can try to press it straight, this will help when it comes to trimming.
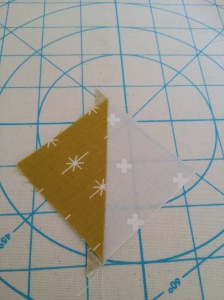
The pressed HST, notice how straight the center seamline is and how the seam allowance creates dog ears folded towards the darker half of the square. Also notice there is no rippling or bubbling caused by pulling the bias.

The pressed HST, notice how straight the center seamline is and how the seam allowance creates dog ears folded towards the darker half of the square. Also notice there is no rippling or bubbling caused by pulling the bias.

If you have never taken the time to become familiar with the markings on your rotary grid ruler, now is the time! All of those extra markings are just what you need when trimming angles or perfectly trimming your HST with the diagonal straight through the middle. I like to work with as small of a ruler as possible at all times, so here I used a 4 inch square omnigrid clear rotary cutting ruler.
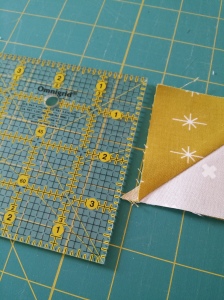
Notice the diagonal lines on the omnigrid? Those are for all of your precision angled cuts.

Notice the diagonal lines on the Omnigrid? Those are for all of your precision angled cuts.

Note: If you are right handed, you will hold the rotary cutter in your right hand, and the ruler in the left. Whenever possible, place the ruler over the part of the piece you plan to use, keeping the waste fabric available to cut off –this will keep you from accidentally cutting into your piece if you lose control.

Carefully align the diagonal line on the ruler with the diagonal seam line. At this point we want to make sure that the remaining square (protected underneath the ruler) is larger than our final cutting dimension. In this case, I am trimming to 2 1/8″ square, so as long as the bottom and left border are beyond that I am happy.
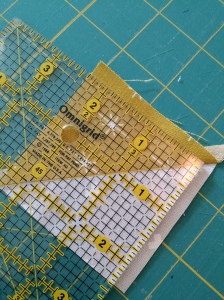
Notice the diagonal is aligned and the protected portion of the square is beyond 2 1/8" in each direction from the edges of the ruler.

Notice the diagonal is aligned and the protected portion of the square is beyond 2 1/8″ in each direction from the edges of the ruler.

This is the point where I cheat a little. Instead of cutting one side, then rotating the fabric and repositioning the ruler, I make two cuts at once.
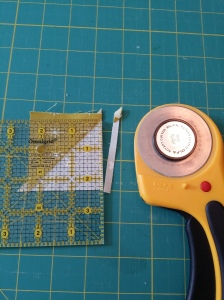
Notice how this cut appears to be perpendicular to my body.
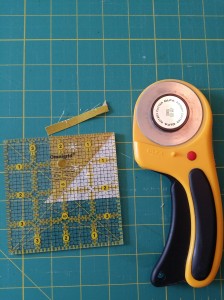
Notice how this cut appears to be perpendicular to my body.

This cut is parallel to my hips, meaning I had to be extra careful to not lose control and let the blade or ruler move as I cut from right to left.

This cut is parallel to my hips, meaning I had to be extra careful to not lose control and let the blade or ruler move as I cut from right to left.

Noted: Admittedly, this is risky because the second cut is parallel to my body rather than perpendicular, meaning I have less control of the rotary cutter. Ideally, we should all only cut perpendicular and away from our body, pushing the rotary blade straight forward from the elbow (see the next image).
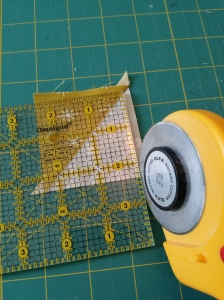
In this image, you can see that I hold the rotary against the edge of the ruler and push the blade away from the body, providing the greatest control.

In this image, you can see that I hold the rotary against the edge of the ruler and push the blade away from the body, providing the greatest control.

At this point, I have trimmed two sides of my HST. I can now rotate the HST so my raw edges are once again above or to the right of my planned ruler placement.
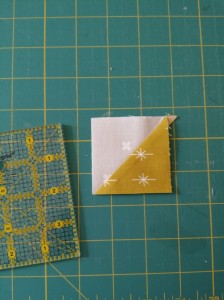
My clean cuts will now be protected and the raw edge will be available when I place my ruler.

My clean cuts will now be protected and the raw edge will be available when I place my ruler.

Again, I place my ruler with the diagonal aligning with the seam. However, there is one major difference, this time when I place my ruler, I will carefully align the left and bottom edge at my final cutting dimension, 2 1/8″.
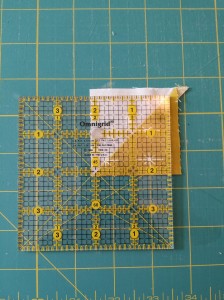
Notice I have aligned the diagonal, and the left and bottom edges to my final cutting dimension.

Notice I have aligned the diagonal, and the left and bottom edges to my final cutting dimension.

I am now ready to make my final two cuts.
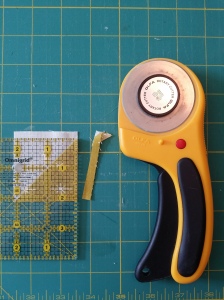
The third cut.
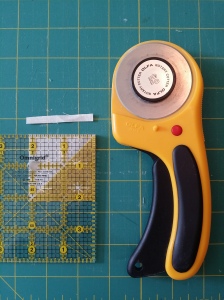
The third cut.

The fourth and final cut.

The fourth and final cut.

So there you have it, a perfectly trimmed HST!
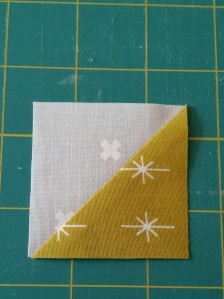
Trimmed HST

Now I only have a few dozen more!

Pressed and trimmed, with many more waiting to be done.

Pressed and trimmed, with many more waiting to be done.
Hey folks!

I know it’s been quiet around here the last few weeks. But that always seems to happen around the beginning of a new semester. Three weeks in to another semester as a full time PhD student, working ~30 hours a week, with a broken wrist –needless to say, things have been pretty busy!

But believe it or not, I have managed to get a few things done this past month! It’s been a great start to 2014, and hopefully I can keep it up over the next 11 months and have an amazingly successful year of quilting and crafting. One project that I have been meaning to tell you all about is the Vintage Quilt Revival Sampler Quilt a Long hosted by Sukie Don’t Ya Know.

I love me a sampler quilt, you never get bored because each block is different! Since, I had been hearing about this quilt a long a few weeks before it got started, and knowing that I would be returning to classes about the same time, I decided to get a jump on some of the blocks. I managed to complete four blocks before the QAL even started, and I even did a little math to make a mini of the first block!

If you haven’t heard about the book yet, it is a compilation of 20 traditional/classic quilt blocks explored in new and modern ways. The book was written by bloggers, Katie of Swim Bike Quilt, Faith of Fresh Lemons, and Lee of Freshly Pieced.  Included in the book, are directions for piecing each block and a project utilizing each (quilts, bags, etc.) as well as 3 sampler quilts. Many of the blocks are constructed using paper-piecing so the book comes with a cd with each of the paper patterns. I have really enjoyed the different blocks in the book, but advise you to check the pattern errata before cutting your fabric. I forgot to do so, and have had some grumbly moments as I have constructed my blocks.

Around the same time that I received my copy of Vintage Quilt Revival from Amazon, (I pre-ordered way back in the summer/early fall, but Amazon sure did take it’s time after the book was released) I picked up a fat quarter bundle of Joel Dewberry’s Heirloom. I love Joel Dewberry fabrics, like love in a really big way, and I sure had been eyeing Heirloom for weeks! So the timing seemed like kismet, new book, new fabrics, yes please! (I sure hope a fat quarter bundle of about 10 prints will be enough combined with my Kona Snow background solid to construct the entire quilt top.)

Anyway, Sukie decided to manage the QAL in order of easiest to most difficult, lucky for me I also started with the two easiest blocks. But then later decided to go in order of the blocks in the book, which translated to weeks 1 and 4 of the QAL. The QAL actually began on Jan. 21, so this past week was technically week 2, and I definitely wanted to  keep up with the linky party. So yesterday and this morning, I went ahead and finished up the blocks for week 2 of the QAL.

Now, I probably wont be able to keep up sharing a blog post about each week of the QAL, so this week you will get my first six blocks (which by the way are actually weeks 1, 2, and 4).

xo,

Erin Myone


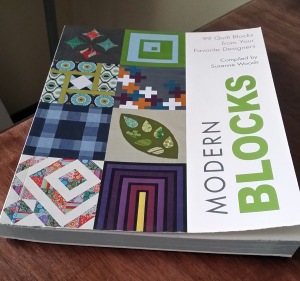
Modern blocks book

One project that is continuing into the new year is the And Sew We Craft Modern Blocks Quilt a Long. This month’s block was selected by Alyce of Blossom Heart Quilts. You can find a tutorial for the Everything Equal block on her blog here.

Alyce’s Block

Alyce mentioned that she specifically chose this block as an opportunity to use some of the smaller scraps that remain after cutting the previous nine blocks. I did manage to use a few of these scraps, but I also wanted to use this block as an opportunity to integrate all of the prints into one block to help tie the quilt together. I know normally in these posts at this point, I would share a fabric key. But this time I am going to be a little lazy, because instead of 2-4 fabrics this one has all of the Juliana Horner prints that I own (yes, I am missing 3 prints from the Rosette line). So instead I’m just going to skip to the block reveal this time!

I am pretty happy with my fabric placement and construction, but it was a simple block… I did have to use a few of the prints more than once, but it all seems to balance out nicely.

I haven’t decided on a layout yet, and we still have three more blocks so there is plenty of time. I think I will definitely add sashing and cornerstones between the blocks. I might remake a few of the blocks too (second row right, and third row center). Or I might even make a few extra blocks so that it’s 16 or 20 instead of 12, who knows?!?! I’m really happy that I have joined in on this particular quilt a long, the monthly block allows enough time to enjoy the process free of stress. Make sure you head over to the linky party to see everyone else’s block!

xo,

Erin Myone

I finally finished cutting the fabric for the APQ Tone it Down quilt a long! I really tried to space out my cutting sessions a little due to my arm, but I was getting FOMO (Fear of Missing Out) watching images pop up on instagram so I pushed the limits a few nights and finished it up.

But as soon as I finished cutting I felt the need to stay up and start sewing one of the blocks. So I put in an hour of sewing, staying up until 2 am before sleep got the better of me. But I did wake up bright and early, excited to start sewing again and finish it up! And about 3 hours later I did. Can you believe it? About 4 hours for a single block! This is definitely the most intense and time consuming quilt block I have ever attempted.

I did some more math and figured out that each block has 97 individual pieces! Yikes! But I feel so accomplished having completed one, I can only imagine how I will feel when I finish the remaining 19! I really took my time , but it turns out my 1/4″ seam allowance was closer to 5/16″ so in the end I had to do some careful trimming to make up for this in order to align my corners — if I am consistent with this seam allowance through the entire quilt it won’t be an issue and the blocks will all come out the same size.

So. I have no idea how long this quilt will take me, since each block is so time-consuming. But this might be a year long project! Are you participating in the quilt a long? Did you stick with the neutral background and bright foreground? Have you checked in on the lead bloggers progress or seen a really stunning version by someone else? Let me know in the comments!


xo,

Erin Myone


<a href=”http://www.bloglovin.com/blog/10258423/?claim=ka64y85pm4t”>Follow my blog with Bloglovin</a>

Each time I start to type, I have the greatest desire to remove my splint… Or just give up before I hardly get started, I suppose this is a test of my patience.

You see, winter arrived in full force this week, just in time for the solstice, and I fractured my right wrist when I slipped on the icy sidewalk in front of our house. I definitely underestimated the layer of ice that had rained down the night before. But it was the last day of finals, and I had things to do…

Anyway, its fractured and splinted now, and I still have things to do–but I have a pretty good excuse for not doing them…

=====Nine Days Later=====

Well, I started writing this post Pre-Christmas, but with the splint and the fresh fracture I just didn’t have the patience for it… Now, I have a neon yellow cast which I will wear until February. And, I need to practice typing with it anyway because my life will not wait for it to heal. Yes, it was my right wrist and yes, I am right-handed. About as frustrating as it can get…

But anyway, before visiting with the orthopedic surgeon today, I did a little bit of cutting and sewing with the splint on. You see, I had a grand plan to finish some WIP’s and start a few new projects during this break. So I ordered some new fabrics and was very excited to work on the Tone it Down quilt designed by Lissa of Moda Lissa for the American Patchwork & Quilting Quilt a-long. I finally ordered some Essex linen to make up a few projects from Ayumi Takahashi’s Patchwork Please book. I will be working on Elizabeth  of Don’t Call me Betsy’s Lucky Stars Block of the Month  in 2014. Working on my Lala Salama 100 Quilts for Kenya quilt. And continuing the And Sew We Craft Modern Blocks QAL and Crochet a-long blanket!

I had big plans for this Holiday from classes! It was the last day of Finals week when I injured my wrist and on the same day I began to receive some of the beautiful fabrics I  had ordered! Then for Christmas, I received a generous gift certificate for the Fat Quarter Shop from my parents. My pre-order of Vintage Quilt Revival arrived on my doorstep, along with the rest of the fabrics I had ordered pre-injury (I mean, those holiday sales were crazy good right?).

So, as I said, I did a little bit of cutting and sewing between the time when I injured my wrist and today’s orthopedic casting. For starters, I spent a good amount of time cutting fabric for the Tone it Down quilt. Just last night, I finished cutting all of the bright fabrics–leaving only the low volume background fabrics to finish up. Right about now, I am wishing I had a die-cutting machine… I think I could manage cranking that with my left hand since I have been strongly advised against using my right hand for much of anything beyond typing.

I also, cut and stitched up a Prettified Pincushion from Patchwork Please with my new Essex linen.

There are a couple of other great little patterns in that book that I would love to work on, I admittedly got on the Zakka 2.0 bandwagon a little late after seeing all of the darling projects pop up during the Zakka a-long. I am pretty excited about the Happy Hexagon trivet, Sweet Trips Embroidery Pouch, Vintage Pencil Case and Triangle Patchwork Box Pouch, all are far too cute (take a peak at some of these in the flickr group.)

That’s all I managed during those few days surrounding Christmas. Maybe I can sew with my hand in the cast, but I probably won’t be able to do much else (rotary cutting, crochet, etc…) The good news is that I officially finished my Master’s degree (yay!), the bad news is I am pretty behind on a lot of other things (graduate assistantship hours, journal submissions, conference abstracts, literature reviews, class prep. *the exciting life of a PhD student*), but maybe I  can catch up a bit now that I wont be tempted by crafting… We’ll see!

Oh, and Happy New Year! To quote Walt Disney, “Keep moving forward.”

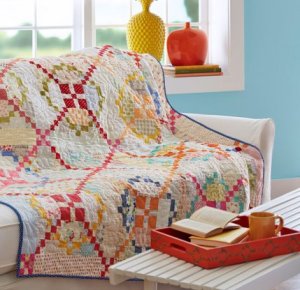
I know it’s been a while since my last post, but that story is for a different post all-together. Today, I want to tell you all about the American Patchwork & Quilting Magazine’s Tone it Down quilt along.  Below, I have shared an image of the Tone it Down quilt designed by Lissa Alexander of Moda Lissa.

AP&Q Tone it Down

So here’s MY backstory on this project… I follow a number of quilter bloggers using various methods of social media including Instagram (follow me @erinmyone), Bloglovin (find my feed to see who I follow, erinmyone), and Facebook. A few of the bloggers I follow are Camille Roskelley of Thimble Blossoms and Sherri McConnell of A Quilting Life.  Little did I know that both of these ladies had been invited to participate in a very public quilt along, that is until Camille started posting about it back in November. The tricky thing about all of this was that the quilt is featured in the February 2014 issue of APQ, and you know, it was November! But because magazine world is kind of funny the issue went out on newsstands on December 3rd, for those of us who aren’t subscribers.

So I waited patiently, kind of, it was really hard to see Camille posting all kinds of beautiful photos on Instagram of her progress but not have the information available to get started myself.  And then, I noticed that Sherri was also getting geared up to quilt, still a few days before the magazine was even available so I was getting a little anxious and itchy to start. But, I was starting to get an idea of what I wanted to do with my own quilt, since each of these ladies was putting a different spin on it.

However, one thing I hadn’t realized from their updates was that there are two versions of this quilt. The first version, the original designed by Lissa that is, is the Super Scrappy Block Variation. The second is the more prominent method described in the magazine, a strip pieced method that saves some time in the cutting and piecing stages by minimizing the background variation within the individual blocks. I honestly couldn’t help myself… This quilt is the type of quilt you will keep forever and hand down in the family, I want it to be amazing and special, I want it to hold your attention as your eyes scan through the many variations of fabric within the blocks, I want it to take a long while so that it is worthy to last a long while… I chose to do the Super Scrappy Variation.

To really make the super scrappy variation, well, scrappy, I decided to cut all of my fabrics before I begin so that I can achieve a good variation in all of the blocks. Now, because I am working with assorted low volume prints for the background, all I really need to know are how many pieces of each size to cut, not how many pieces of each size for each print to cut. So I started doing some math, for the full size quilt there are 20 blocks, without giving away too much information this means from the Low Volume Prints, I need 80 pieces of cut A, 160 pieces of cut B, 240 pieces of cut C, and 560 pieces of cut D, and 49 pieces of sashing. These numbers are for the entire quilt, in the magazine they list what you will need for a single block, but because I  want an even distribution of my low volume prints across the entire quilt, I needed to know what to cut in advance for the whole quilt. Also, because it’s a scrappy variation, I can use different proportions of the different prints, so if I love a fabric I might cut a lot more of it than a fabric that I am less fond of. But how was I ever going to keep track of all of those pieces?

I created a cut sheet, the document I prepared is strictly for the Super Scrappy Variation and allows me to just highlight or mark through the pieces as I went, tracking my cutting progress. I shared a photo of my cut sheet on Instagram and have had a request for a copy of the document.


As much as I would love to share this cut sheet openly with everyone, I know that some of us are brilliant at reverse engineering a quilt, so that we can whip it up without purchasing a pattern. I know knitters who do it, crocheters who do it, and quilters who do it. I’ve even done it myself, but then my conscience kicked in and I remembered that somewhere out there a designer put in some time to figure this out, prepare it for publication, and put their name on the line to risk the sometimes expensive publication fees, so I went ahead and bought the pattern anyway and considered my momentary slip as practice for my own quilt design skills (truly I did.) I don’t want to live and try to work (as a designer/artist) in a world where we are all comfortable with skimming someone else’s work, and unfortunately our desire for an open online community sharing and pinning away we often make it that much easier to take someone’s work without paying any contribution for their efforts…

With that said, I would be glad to share this cut sheet with any of you who have already purchased the magazine (or if you haven’t yet you can purchase a digital copy here.) How will I know if you have purchased the magazine? Well my request is that you share a picture of your progress on the quilt so far. Maybe that is just a photo of the magazine, a stack of fabrics waiting to be cut, a bunch of tiny pieces already cut, or maybe even a finished block or two!  Just share your image in my Linky Library here, this link will take you to another website but you will be directed back here, don’t worry! Or direct me to your flickr, or instragram posts in a comment below!

One last tip!!! For the bright prints you actually only  need a 9×9.5″ cut of fabric. So if you want to cut down on expenses, share a quarter of a yard with a friend or two, or three, or four! OR reduce the number of prints you will use and cut multiple blocks worth of bright prints from a quarter yard and simply space your blocks pleasingly across the entire quilt.

Don’t forget to check out the other quilter’s progress on Flickr or Instagram, and don’t forget to tag your photos with #APQQuiltalong so everyone else can keep up with you too!

And check out the quilt along hosts and bloggers progress at these links below!

Well hello there!

I hope you have all had lovely holidays, if you are in the United States we’re talking Thanksgiving, and if you are anywhere in the world celebrating Hanukkah! This year my husband and I spent our first Thanksgiving on our own without either side of the family, here in Ames, Iowa. We really didn’t make any plans, considering he would be away at work until around 5 p.m. that evening, we just didn’t know what would work for us. But then on Wednesday, Nov. 27 (our anniversary, no less) I was starting to become very bummed about being away from family and not making any plans of our own. So, I jumped in my truck and headed to the grocery store. I picked up all of the fixings for a full-scale Thanksgiving meal for 4-6, including enough to make 5 different types of pies! I was a little over excited maybe. I planned a menu of Cornish game hens, stuffing, mashed potatoes and gravy, green bean casserole, glazed carrots and pie! I also picked up a few Turkey breast chops to cook with the stuffing for leftovers.

On Thanksgiving, I fixed the apple pie in the morning and started the crock-pot with the turkey chops and stuffing. I managed to talk myself down from baking all five pies that day, instead, we will have a pie a week through Christmas! Then I spent the day relaxing until around 4 p.m. when I began working on the rest of the meal.


This was my first attempt at cooking Thanksgiving dinner and overall the outcome was great, granted there was no full turkey involved. As we move away from our family, I have found it’s important to begin creating our own traditions so that we have special memories, rather than another night of an average meal and television. So, following the meal, we built the tree, a silver tinsel tree inherited when my Grandma passed away last spring. But decided to wait and purchase new decorations to transform it into our tree the following day.

Again, I really hope you are enjoying peaceful and joyful times with your family during this special time of year. The winter brings us together in close proximity, like no other season. Whatever your faith, or lack thereof, appreciate those around you and share joyful experiences and hopeful wishes as we move into the new year.

xo,

Erin Myone

Hey! Guess what?

I won the October prize for the And Sew We Craft Modern Blocks Quilt a Long! With your help, I received 120 “Likes” making my block the most “liked” block, and therefore the winner! Above is a photo of the October “Best Friends” block, and below is a photo of my prize, a Fat Quarter bundle of Cypress Acacia by Tula Pink! The sponsor of the October prize, The Fat Quarter Shop, also included a free pattern for their quilt Layer Cake Lemonade. I am so thankful that there are excellent sponsors out there, who give so freely of wonderful prizes, it makes being part of the online craft community so much fun!

I am so happy to have won this prize, I think Tula Pink’s fabrics are really lovely. Now, I will need to buy the fat quarter bundles for the other two color ways in the Acacia line. I think, I am a little OCD about having complete collections… But really they are lovely, and why wouldn’t I want them? So keep an eye out, as these fabrics start popping up in projects in the next  few months. I am not sure what I will do with them yet, but I am very excited to get to work with them!

Finally, I want to thank all of you who took a few minutes to travel over to the Linky party at And Sew We Craft to vote for my block. If you only made it over to vote once, I thank you, that is awesome. If you went back on multiple occasions to vote for my block, I cannot be more thankful for your support, you are amazing people!

xo,

Erin Myone

Welcome back!

I am here to share the December block for the And Sew We Craft Modern Blocks Quilt a Long. This month’s block is “Crossroads” originally designed by Angela Pingle blogger of Cut to Pieces, chosen and instructed for the Quilt a Long by Amy at Actually Amy. If you would like to attempt the block yourself, and haven’t purchased the Modern Blocks book (compiled by Susanne Woods), you can find a tutorial led by Amy here. Below is Amy’s block, sewn from Little Apples fabrics by Aneela Hoey for Moda, which by the way is currently on sale at The Quilted Castle.

This is another block in the quilt a long that works best if you have a novelty print like those from Little Apples because you can fussy cut the larger pieces, as Amy did for the children playing and the clothes. Because I am using all-over non-directional prints, I really didn’t bother fussy-cutting any of my pieces, but I did choose to use that extra space for larger prints which I haven’t been able to utilize throughout all of the blocks. I also, chose to maintain my background solid to create continuity within the blocks.

So, above is my fabric key, I chose to work with Terrace Main in orange cream, Bouquet in sprout, and Rosebed in Pomegranate. All of these fabrics are from Juliana Horner’s 2013 Rosette line, designed and sold exclusively at JoAnn’s Fabrics (which makes it really accessible when you live in a town without amazing modern fabric shops.) When I purchased my fabrics, back in June/July, I purchased 9 of the 12 prints in the line, there were a few I just didn’t love to pieces at the time. But now, I am really wishing I had purchased those other prints so I could have the full collection, unfortunately those three have sold out at my local JoAnn’s, and they don’t seem to be bringing them back. They are available online, but only in full yard cuts and I really only want half yards, so I’m on the fence about ordering them. But I will mention, that Juliana Horner has already introduced some new fabrics at JoAnn’s in November. I went ahead and snatched up a half yard of each of those too, and am in love with the colors and prints, but that’s for another post.

So here she is, a little unconventional as far as color combination, but I think actually quite lovely.  This was a challenging block to match seams on, and I think I could actually create it with greater success, if I re-organized how the blocks are pieced. But I won’t, because I am overall pretty happy with the outcome.

A few photos to swoon over…

And an updated photo of all 8 completed blocks, thus far. Not too shabby!

The plan is for 12 total blocks, so we are already 2/3 finished with the blocks.

However, I finally purchased the book, and I think I might just make up a few more blocks, maybe an extra four, so it is a 16 block, or even an extra 8 so that it is a 20 block… There are just so many blocks in the book that I want to try, and where better to put them than in a sampler quilt! (There are by the way, 99 blocks in the book, but I won’t be making them all, for this quilt at least!

So, why not pop over to the Linky party to see what the other quilt a long participants are whipping up this month! Also, be sure to return tomorrow for a very special post also related to the Modern Blocks Quilt a Long, which I know some of you have been asking about!

xo,

Erin Myone