Archives for category: Uncategorized

A few days ago, I took us all back to basics with a post on trimming Half Square Triangles. Except, right in the middle of it I taught you how to cheat! The cheat instructed you how to trim HSTs without rotating for every side, essentially saving a little bit of time by cutting two sides at a time and only rotating the piece once between the second and third trim.

I did include a warning regarding the danger of the method, as its more likely to result in losing control of your rotary blade. What’s the worst that could happen, you ask? Well you could accidentally slice into the piece you are trying to trim, rendering it useless. Or even worse, you could accidentally cut yourself. Trust me, I have done it and I’ve seen other skilled quilters and sewers do it as well.

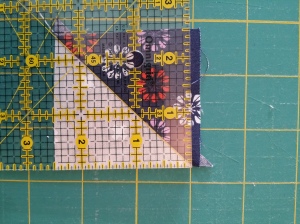
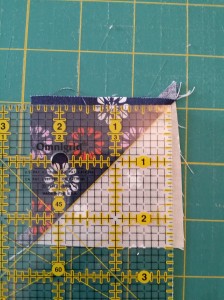
Today, I would like to redeem myself as a teacher, and show you the safest way to trim HST. So, let’s try again, this time without cheating. Imagine you have already pressed your HST and you are all set to cut. Once again, you will align the diagonal line on your cutting ruler with the diagonal seam, careful to protect (under the ruler) more than what is needed for your final dimension. I always start with my diagonal running from lower left to upper right ( like a forward slash / ). You make the first cut.

HST Trimming

The first cut will trim the excess grey fabric to the right of the ruler using the / diagonal.

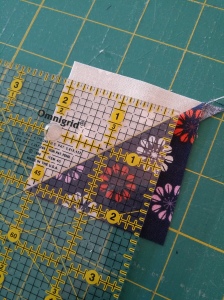
Then rotate 90 degrees clockwise, realign the ruler with the diagonal running from upper left to lower right (like a back slash \ ). Once again you will cut on the right side of the ruler. Notice that the first cut now aligns perfectly to the bottom edge of the ruler and the diagonal points directly to the corner. Make your second cut.

HST Trimming

The second cut will trim the navy floral using the \ diagonal

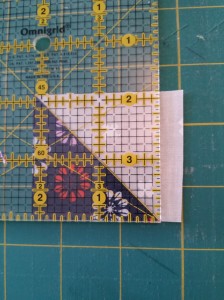
Once again rotate the fabric 90 degrees clockwise. This time you will align the diagonal ( / ) as well as the left edge of the fabric with your final cutting dimension. So in this case, I aligned the left edge at 2 1/8″. Make the third cut.

HST Trimming

Ready for the third cut, trimming the navy floral print using the / diagonal

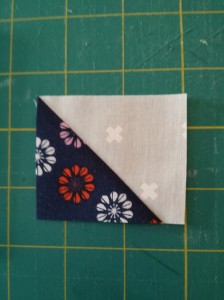
At this point it’s easy to see that you have one side left to trim in order to square the piece at 2 1/8″.

Notce the extra lip of grey fabric past the lower point of the diagonal seam.

Notice the extra lip of grey fabric past the lower point of the diagonal seam.

After a final 90 degree rotation, the diagonal ( \ ) alignment should direct your edge alignment to the final cutting dimension. Make the fourth cut.

The fourth cut, after rotating again we are once again using the \ diagonal.

The fourth cut, after rotating again we are once again using the \ diagonal.

So today’s Back to Basics lesson used exact steps to carefully and precisely trim your HSTs. Again, the additional rotation is a wise move when you are concerned with maintaining control of the rotary cutter and ruler as you will always cut directly away from your body, instead of across the body.

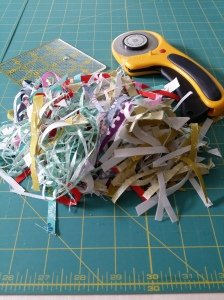
HST Quilt Trimmings
Happy trimming!


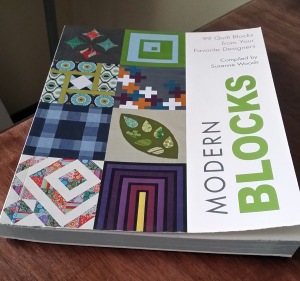
Modern blocks book

One project that is continuing into the new year is the And Sew We Craft Modern Blocks Quilt a Long. This month’s block was selected by Alyce of Blossom Heart Quilts. You can find a tutorial for the Everything Equal block on her blog here.

Alyce’s Block

Alyce mentioned that she specifically chose this block as an opportunity to use some of the smaller scraps that remain after cutting the previous nine blocks. I did manage to use a few of these scraps, but I also wanted to use this block as an opportunity to integrate all of the prints into one block to help tie the quilt together. I know normally in these posts at this point, I would share a fabric key. But this time I am going to be a little lazy, because instead of 2-4 fabrics this one has all of the Juliana Horner prints that I own (yes, I am missing 3 prints from the Rosette line). So instead I’m just going to skip to the block reveal this time!

I am pretty happy with my fabric placement and construction, but it was a simple block… I did have to use a few of the prints more than once, but it all seems to balance out nicely.

I haven’t decided on a layout yet, and we still have three more blocks so there is plenty of time. I think I will definitely add sashing and cornerstones between the blocks. I might remake a few of the blocks too (second row right, and third row center). Or I might even make a few extra blocks so that it’s 16 or 20 instead of 12, who knows?!?! I’m really happy that I have joined in on this particular quilt a long, the monthly block allows enough time to enjoy the process free of stress. Make sure you head over to the linky party to see everyone else’s block!

xo,

Erin Myone

Welcome back!

I am here to share the December block for the And Sew We Craft Modern Blocks Quilt a Long. This month’s block is “Crossroads” originally designed by Angela Pingle blogger of Cut to Pieces, chosen and instructed for the Quilt a Long by Amy at Actually Amy. If you would like to attempt the block yourself, and haven’t purchased the Modern Blocks book (compiled by Susanne Woods), you can find a tutorial led by Amy here. Below is Amy’s block, sewn from Little Apples fabrics by Aneela Hoey for Moda, which by the way is currently on sale at The Quilted Castle.

This is another block in the quilt a long that works best if you have a novelty print like those from Little Apples because you can fussy cut the larger pieces, as Amy did for the children playing and the clothes. Because I am using all-over non-directional prints, I really didn’t bother fussy-cutting any of my pieces, but I did choose to use that extra space for larger prints which I haven’t been able to utilize throughout all of the blocks. I also, chose to maintain my background solid to create continuity within the blocks.

So, above is my fabric key, I chose to work with Terrace Main in orange cream, Bouquet in sprout, and Rosebed in Pomegranate. All of these fabrics are from Juliana Horner’s 2013 Rosette line, designed and sold exclusively at JoAnn’s Fabrics (which makes it really accessible when you live in a town without amazing modern fabric shops.) When I purchased my fabrics, back in June/July, I purchased 9 of the 12 prints in the line, there were a few I just didn’t love to pieces at the time. But now, I am really wishing I had purchased those other prints so I could have the full collection, unfortunately those three have sold out at my local JoAnn’s, and they don’t seem to be bringing them back. They are available online, but only in full yard cuts and I really only want half yards, so I’m on the fence about ordering them. But I will mention, that Juliana Horner has already introduced some new fabrics at JoAnn’s in November. I went ahead and snatched up a half yard of each of those too, and am in love with the colors and prints, but that’s for another post.

So here she is, a little unconventional as far as color combination, but I think actually quite lovely.  This was a challenging block to match seams on, and I think I could actually create it with greater success, if I re-organized how the blocks are pieced. But I won’t, because I am overall pretty happy with the outcome.

A few photos to swoon over…

And an updated photo of all 8 completed blocks, thus far. Not too shabby!

The plan is for 12 total blocks, so we are already 2/3 finished with the blocks.

However, I finally purchased the book, and I think I might just make up a few more blocks, maybe an extra four, so it is a 16 block, or even an extra 8 so that it is a 20 block… There are just so many blocks in the book that I want to try, and where better to put them than in a sampler quilt! (There are by the way, 99 blocks in the book, but I won’t be making them all, for this quilt at least!

So, why not pop over to the Linky party to see what the other quilt a long participants are whipping up this month! Also, be sure to return tomorrow for a very special post also related to the Modern Blocks Quilt a Long, which I know some of you have been asking about!

xo,

Erin Myone

Did you see my making space featured this week as part of  And Sew We Craft’s Where We Create blog series? I shared a little bit about my space and a few photos of my different work stations and storage spaces. I have a few additional shots from a wider angle, I wish, wish, wish it were not so dark and ugly…

But amazingly I can work in there so much easier than past spaces which were small and beautiful. I guess it really is what’s on the inside that counts, and inside these ugly walls and terrible carpet there is a lot of space!!! (Again, I apologize for the blurriness of these photos, it’s just the lighting that I’m working with in this basement!)

So behind that wardrobe, coat rack, and the yarn/fabric shelf is where we hide household items like the Christmas tree, and such… But I am becoming more and more tempted to absorb that space into my crafting area… I’ve also recently purchased a rolling clothing rack, which I plan to hang a lot of my apparel items and fabric on.

This was still pretty early after our move in this summer, so it’s not a total mess yet! I have also added another large table in the center of this open space for cutting and drafting garment patterns.  Originally I was planning to purchase a new larger loom to take up this space since I sold my last one, but that hasn’t worked out yet… Also, I don’t really want to think about getting it down those stairs, or back up again when we move some day!

I admit, this isn’t my prettiest set-up, but it does function the best! Anyone remember this beautiful set-up from Manhattan, Kansas?

In this house, I actually had two rooms all to myself for my “making space”. One room was for everything I wanted to work on, while the other room was specifically for weaving projects. The first room was a gorgeous yellow and white, the second room was teal and white. So much color and so much light! I was spoiled!

Dreamy, right? So bright and lovely… Sigh. Do you have your dream making space? Someday I hope to combine these two places, the ample room of the current one, with the bright setting and colors of the previous rooms…

xo,

Erin Myone


I always start my blogs with the best intentions! I intend to write every day, and for a while I do. I intend to craft everyday, and for a while I do. I intend to improve on the appearance of the blog, win the hearts of my readers, gain sponsorship and live happily ever after, and well I’m not sure if those things have ever happened. But I try…

 photo 2013-09-07151257-1_zpsdced433a.jpg

However, I am also a student. I really try to keep the two lives separate – the crafter/blogger life and the academic life. But, c’est la vie, the two seem to battle each other for my attention and typically the academic life wins!

 photo 2013-09-11171210-1_zps2e019e33.jpg

So here I am a student, a researcher, and some semesters I am even an instructor. I love it, honest, I do. But darn if I don’t start to miss my crafty-bloggy days. This August, I began my PhD studies in Apparel Design and Product Development at Iowa State University – and it’s excellent. I love the department, the faculty, the facilities and equipment, the research, the classes, the general passion for knowledge.


 photo 2013-09-15113256-2_zpsf82df74d.jpg

But I am also, still in the final pages of my Master’s thesis. My thesis has been a true trial in patience and endurance. I started working on this research January 2012, and here I am, fall 2013 still working on it. The thesis definitely adds a lot of stress and anxiety to my days as it really, really needs to get finished, ASAP! And it’s another thing I try to fit in around being a new PhD student, taking a full load of credits and working a 20 hour assistantship each week.


 photo 2013-09-12191521-1_zps5a4d9ee3.jpg

Don’t even get me started on my successful summertime diet… The best I can say on that front is that if it isn’t raining, I ride my bike to campus everyday.

 photo 2013-09-17100719_zps8b4603d4.jpg

I am so lucky for my supportive family, without them I am pretty sure I wouldn’t make it some days!

 photo 2013-09-27222312-1_zps31961c2b.jpg

And the things in life that happen, that are unplanned. The things that aren’t the PhD, the Master’s thesis, the diet and exercise, the crafty/bloggy time, those things really matter too. The unexpected trip that brought the family back to the middle of America from all across the world (literally).

 photo 2013-09-26195004_zpsb06c0895.jpg

And the friends who stood by in support through the worst of it. Life throws all kinds of lemons at you, and the extra hands to help juggle them are what really makes it possible to make the lemonade.

Good Morning!

It’s a brisk 59º here in Ames, Iowa this morning. Too good to be true in August, a half hour dog walk did not seem long enough!

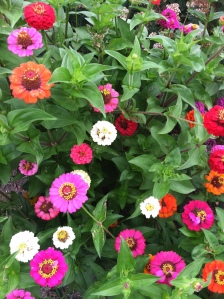
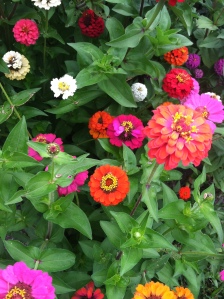
My husband tells me these are dahlias, whatever they are, they are beautiful!

Have a great day!

Erin Myone

Neighbor's Zinnia Mixture

Neighbor’s Zinnia Mixture

My neighbor has a wonderful zinnia mixture! The colors and variety makes me happy every time I walk by. Walks with Tonka are always full of the beauty of nature and give me a wonderful mental place to begin or end my day.

2013-08-06 08.44.07

Zinnia’s are particularly wonderful for their natural dye purposes. They are wonderful flowers to hammer print with! You can get the most lovely imprints and details in vibrant oranges and yellows.