Archives for posts with tag: Quilt Along

Hey folks!

I know it’s been quiet around here the last few weeks. But that always seems to happen around the beginning of a new semester. Three weeks in to another semester as a full time PhD student, working ~30 hours a week, with a broken wrist –needless to say, things have been pretty busy!

But believe it or not, I have managed to get a few things done this past month! It’s been a great start to 2014, and hopefully I can keep it up over the next 11 months and have an amazingly successful year of quilting and crafting. One project that I have been meaning to tell you all about is the Vintage Quilt Revival Sampler Quilt a Long hosted by Sukie Don’t Ya Know.

I love me a sampler quilt, you never get bored because each block is different! Since, I had been hearing about this quilt a long a few weeks before it got started, and knowing that I would be returning to classes about the same time, I decided to get a jump on some of the blocks. I managed to complete four blocks before the QAL even started, and I even did a little math to make a mini of the first block!

If you haven’t heard about the book yet, it is a compilation of 20 traditional/classic quilt blocks explored in new and modern ways. The book was written by bloggers, Katie of Swim Bike Quilt, Faith of Fresh Lemons, and Lee of Freshly Pieced.  Included in the book, are directions for piecing each block and a project utilizing each (quilts, bags, etc.) as well as 3 sampler quilts. Many of the blocks are constructed using paper-piecing so the book comes with a cd with each of the paper patterns. I have really enjoyed the different blocks in the book, but advise you to check the pattern errata before cutting your fabric. I forgot to do so, and have had some grumbly moments as I have constructed my blocks.

Around the same time that I received my copy of Vintage Quilt Revival from Amazon, (I pre-ordered way back in the summer/early fall, but Amazon sure did take it’s time after the book was released) I picked up a fat quarter bundle of Joel Dewberry’s Heirloom. I love Joel Dewberry fabrics, like love in a really big way, and I sure had been eyeing Heirloom for weeks! So the timing seemed like kismet, new book, new fabrics, yes please! (I sure hope a fat quarter bundle of about 10 prints will be enough combined with my Kona Snow background solid to construct the entire quilt top.)

Anyway, Sukie decided to manage the QAL in order of easiest to most difficult, lucky for me I also started with the two easiest blocks. But then later decided to go in order of the blocks in the book, which translated to weeks 1 and 4 of the QAL. The QAL actually began on Jan. 21, so this past week was technically week 2, and I definitely wanted to  keep up with the linky party. So yesterday and this morning, I went ahead and finished up the blocks for week 2 of the QAL.

Now, I probably wont be able to keep up sharing a blog post about each week of the QAL, so this week you will get my first six blocks (which by the way are actually weeks 1, 2, and 4).

xo,

Erin Myone


Modern blocks book

One project that is continuing into the new year is the And Sew We Craft Modern Blocks Quilt a Long. This month’s block was selected by Alyce of Blossom Heart Quilts. You can find a tutorial for the Everything Equal block on her blog here.

Alyce’s Block

Alyce mentioned that she specifically chose this block as an opportunity to use some of the smaller scraps that remain after cutting the previous nine blocks. I did manage to use a few of these scraps, but I also wanted to use this block as an opportunity to integrate all of the prints into one block to help tie the quilt together. I know normally in these posts at this point, I would share a fabric key. But this time I am going to be a little lazy, because instead of 2-4 fabrics this one has all of the Juliana Horner prints that I own (yes, I am missing 3 prints from the Rosette line). So instead I’m just going to skip to the block reveal this time!

I am pretty happy with my fabric placement and construction, but it was a simple block… I did have to use a few of the prints more than once, but it all seems to balance out nicely.

I haven’t decided on a layout yet, and we still have three more blocks so there is plenty of time. I think I will definitely add sashing and cornerstones between the blocks. I might remake a few of the blocks too (second row right, and third row center). Or I might even make a few extra blocks so that it’s 16 or 20 instead of 12, who knows?!?! I’m really happy that I have joined in on this particular quilt a long, the monthly block allows enough time to enjoy the process free of stress. Make sure you head over to the linky party to see everyone else’s block!

xo,

Erin Myone

I finally finished cutting the fabric for the APQ Tone it Down quilt a long! I really tried to space out my cutting sessions a little due to my arm, but I was getting FOMO (Fear of Missing Out) watching images pop up on instagram so I pushed the limits a few nights and finished it up.

But as soon as I finished cutting I felt the need to stay up and start sewing one of the blocks. So I put in an hour of sewing, staying up until 2 am before sleep got the better of me. But I did wake up bright and early, excited to start sewing again and finish it up! And about 3 hours later I did. Can you believe it? About 4 hours for a single block! This is definitely the most intense and time consuming quilt block I have ever attempted.

I did some more math and figured out that each block has 97 individual pieces! Yikes! But I feel so accomplished having completed one, I can only imagine how I will feel when I finish the remaining 19! I really took my time , but it turns out my 1/4″ seam allowance was closer to 5/16″ so in the end I had to do some careful trimming to make up for this in order to align my corners — if I am consistent with this seam allowance through the entire quilt it won’t be an issue and the blocks will all come out the same size.

So. I have no idea how long this quilt will take me, since each block is so time-consuming. But this might be a year long project! Are you participating in the quilt a long? Did you stick with the neutral background and bright foreground? Have you checked in on the lead bloggers progress or seen a really stunning version by someone else? Let me know in the comments!


xo,

Erin Myone


<a href=”http://www.bloglovin.com/blog/10258423/?claim=ka64y85pm4t”>Follow my blog with Bloglovin</a>

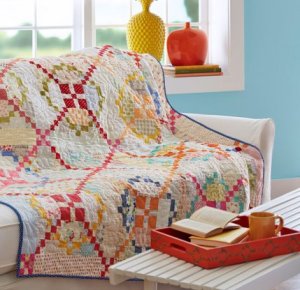
I know it’s been a while since my last post, but that story is for a different post all-together. Today, I want to tell you all about the American Patchwork & Quilting Magazine’s Tone it Down quilt along.  Below, I have shared an image of the Tone it Down quilt designed by Lissa Alexander of Moda Lissa.

AP&Q Tone it Down

So here’s MY backstory on this project… I follow a number of quilter bloggers using various methods of social media including Instagram (follow me @erinmyone), Bloglovin (find my feed to see who I follow, erinmyone), and Facebook. A few of the bloggers I follow are Camille Roskelley of Thimble Blossoms and Sherri McConnell of A Quilting Life.  Little did I know that both of these ladies had been invited to participate in a very public quilt along, that is until Camille started posting about it back in November. The tricky thing about all of this was that the quilt is featured in the February 2014 issue of APQ, and you know, it was November! But because magazine world is kind of funny the issue went out on newsstands on December 3rd, for those of us who aren’t subscribers.

So I waited patiently, kind of, it was really hard to see Camille posting all kinds of beautiful photos on Instagram of her progress but not have the information available to get started myself.  And then, I noticed that Sherri was also getting geared up to quilt, still a few days before the magazine was even available so I was getting a little anxious and itchy to start. But, I was starting to get an idea of what I wanted to do with my own quilt, since each of these ladies was putting a different spin on it.

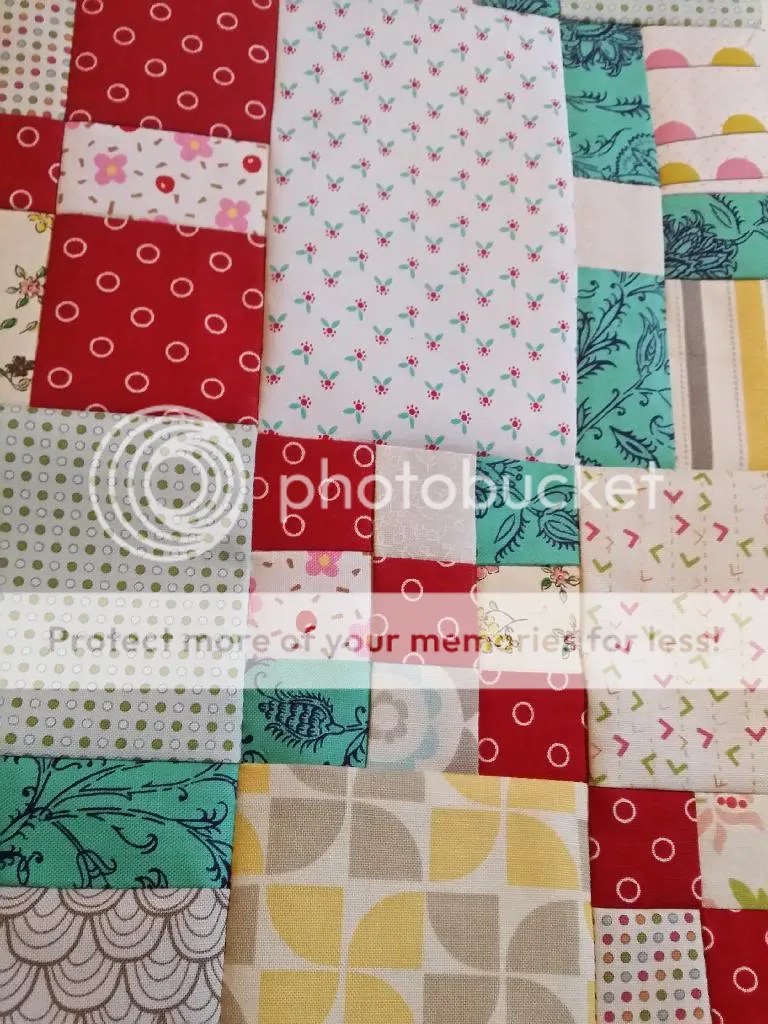
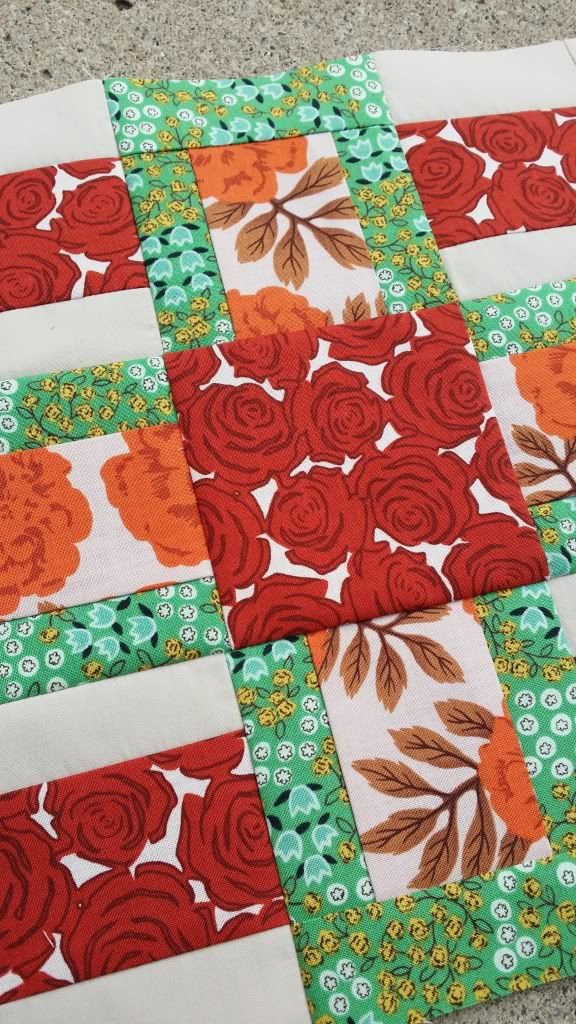
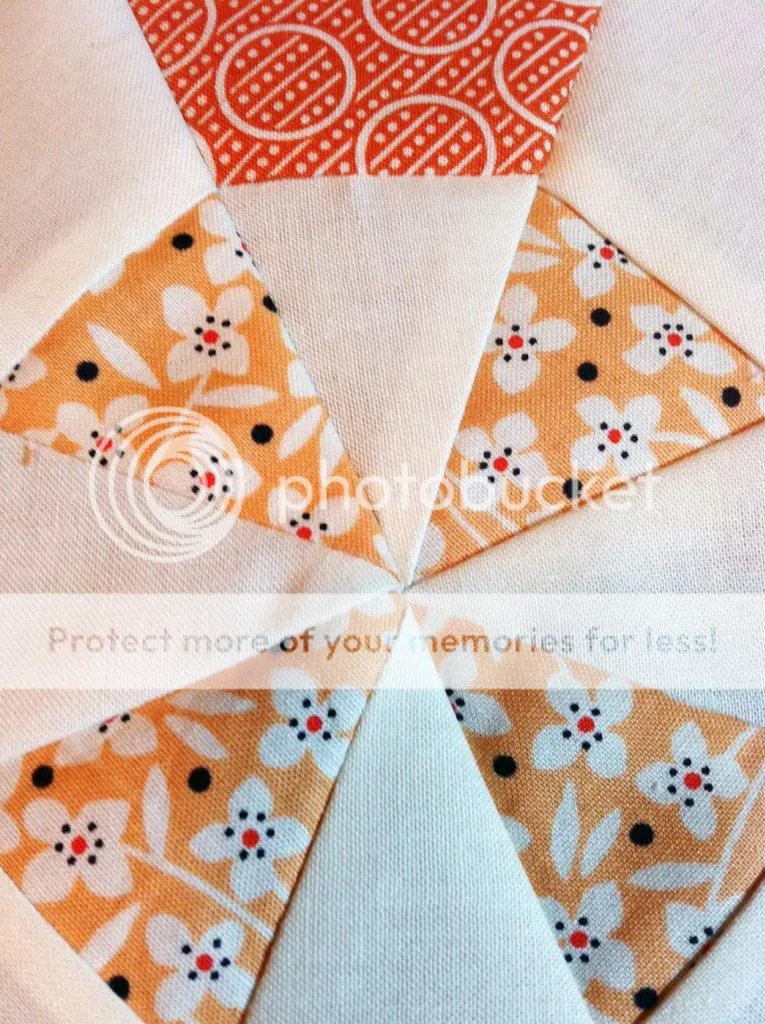
However, one thing I hadn’t realized from their updates was that there are two versions of this quilt. The first version, the original designed by Lissa that is, is the Super Scrappy Block Variation. The second is the more prominent method described in the magazine, a strip pieced method that saves some time in the cutting and piecing stages by minimizing the background variation within the individual blocks. I honestly couldn’t help myself… This quilt is the type of quilt you will keep forever and hand down in the family, I want it to be amazing and special, I want it to hold your attention as your eyes scan through the many variations of fabric within the blocks, I want it to take a long while so that it is worthy to last a long while… I chose to do the Super Scrappy Variation.

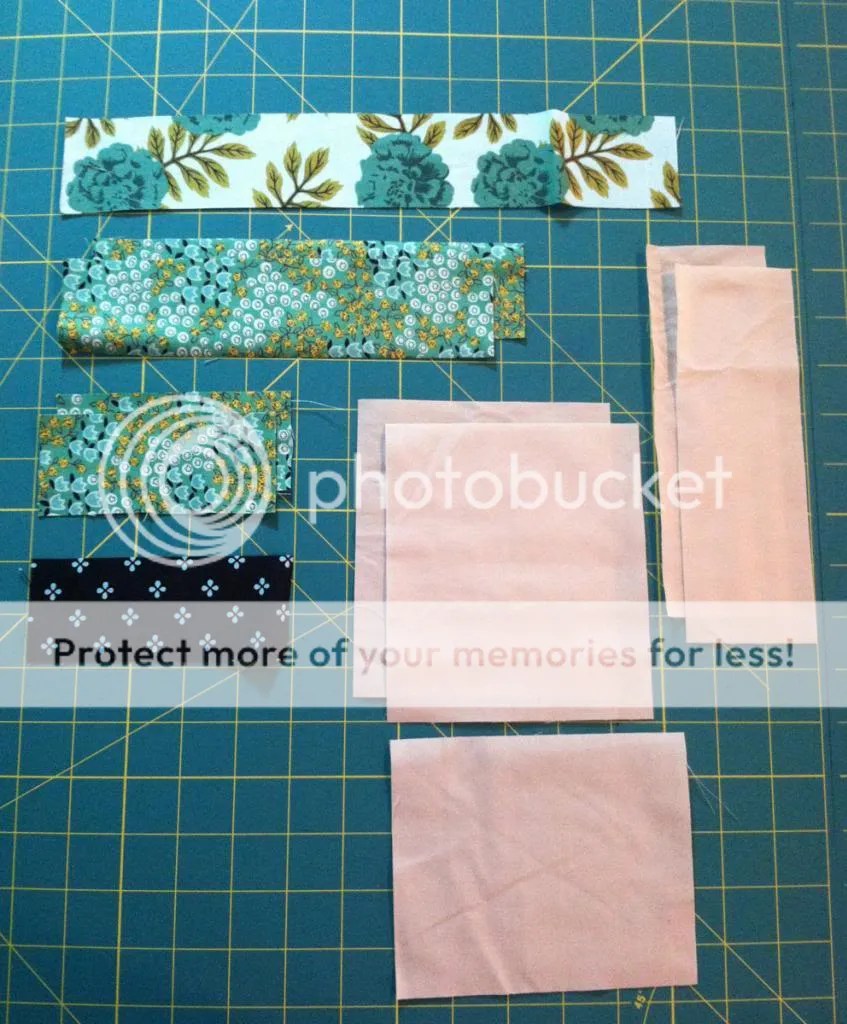
To really make the super scrappy variation, well, scrappy, I decided to cut all of my fabrics before I begin so that I can achieve a good variation in all of the blocks. Now, because I am working with assorted low volume prints for the background, all I really need to know are how many pieces of each size to cut, not how many pieces of each size for each print to cut. So I started doing some math, for the full size quilt there are 20 blocks, without giving away too much information this means from the Low Volume Prints, I need 80 pieces of cut A, 160 pieces of cut B, 240 pieces of cut C, and 560 pieces of cut D, and 49 pieces of sashing. These numbers are for the entire quilt, in the magazine they list what you will need for a single block, but because I  want an even distribution of my low volume prints across the entire quilt, I needed to know what to cut in advance for the whole quilt. Also, because it’s a scrappy variation, I can use different proportions of the different prints, so if I love a fabric I might cut a lot more of it than a fabric that I am less fond of. But how was I ever going to keep track of all of those pieces?

I created a cut sheet, the document I prepared is strictly for the Super Scrappy Variation and allows me to just highlight or mark through the pieces as I went, tracking my cutting progress. I shared a photo of my cut sheet on Instagram and have had a request for a copy of the document.


As much as I would love to share this cut sheet openly with everyone, I know that some of us are brilliant at reverse engineering a quilt, so that we can whip it up without purchasing a pattern. I know knitters who do it, crocheters who do it, and quilters who do it. I’ve even done it myself, but then my conscience kicked in and I remembered that somewhere out there a designer put in some time to figure this out, prepare it for publication, and put their name on the line to risk the sometimes expensive publication fees, so I went ahead and bought the pattern anyway and considered my momentary slip as practice for my own quilt design skills (truly I did.) I don’t want to live and try to work (as a designer/artist) in a world where we are all comfortable with skimming someone else’s work, and unfortunately our desire for an open online community sharing and pinning away we often make it that much easier to take someone’s work without paying any contribution for their efforts…

With that said, I would be glad to share this cut sheet with any of you who have already purchased the magazine (or if you haven’t yet you can purchase a digital copy here.) How will I know if you have purchased the magazine? Well my request is that you share a picture of your progress on the quilt so far. Maybe that is just a photo of the magazine, a stack of fabrics waiting to be cut, a bunch of tiny pieces already cut, or maybe even a finished block or two!  Just share your image in my Linky Library here, this link will take you to another website but you will be directed back here, don’t worry! Or direct me to your flickr, or instragram posts in a comment below!

One last tip!!! For the bright prints you actually only  need a 9×9.5″ cut of fabric. So if you want to cut down on expenses, share a quarter of a yard with a friend or two, or three, or four! OR reduce the number of prints you will use and cut multiple blocks worth of bright prints from a quarter yard and simply space your blocks pleasingly across the entire quilt.

Don’t forget to check out the other quilter’s progress on Flickr or Instagram, and don’t forget to tag your photos with #APQQuiltalong so everyone else can keep up with you too!

And check out the quilt along hosts and bloggers progress at these links below!

Hey! Guess what?

I won the October prize for the And Sew We Craft Modern Blocks Quilt a Long! With your help, I received 120 “Likes” making my block the most “liked” block, and therefore the winner! Above is a photo of the October “Best Friends” block, and below is a photo of my prize, a Fat Quarter bundle of Cypress Acacia by Tula Pink! The sponsor of the October prize, The Fat Quarter Shop, also included a free pattern for their quilt Layer Cake Lemonade. I am so thankful that there are excellent sponsors out there, who give so freely of wonderful prizes, it makes being part of the online craft community so much fun!

I am so happy to have won this prize, I think Tula Pink’s fabrics are really lovely. Now, I will need to buy the fat quarter bundles for the other two color ways in the Acacia line. I think, I am a little OCD about having complete collections… But really they are lovely, and why wouldn’t I want them? So keep an eye out, as these fabrics start popping up in projects in the next  few months. I am not sure what I will do with them yet, but I am very excited to get to work with them!

Finally, I want to thank all of you who took a few minutes to travel over to the Linky party at And Sew We Craft to vote for my block. If you only made it over to vote once, I thank you, that is awesome. If you went back on multiple occasions to vote for my block, I cannot be more thankful for your support, you are amazing people!

xo,

Erin Myone

Welcome back!

I am here to share the December block for the And Sew We Craft Modern Blocks Quilt a Long. This month’s block is “Crossroads” originally designed by Angela Pingle blogger of Cut to Pieces, chosen and instructed for the Quilt a Long by Amy at Actually Amy. If you would like to attempt the block yourself, and haven’t purchased the Modern Blocks book (compiled by Susanne Woods), you can find a tutorial led by Amy here. Below is Amy’s block, sewn from Little Apples fabrics by Aneela Hoey for Moda, which by the way is currently on sale at The Quilted Castle.

This is another block in the quilt a long that works best if you have a novelty print like those from Little Apples because you can fussy cut the larger pieces, as Amy did for the children playing and the clothes. Because I am using all-over non-directional prints, I really didn’t bother fussy-cutting any of my pieces, but I did choose to use that extra space for larger prints which I haven’t been able to utilize throughout all of the blocks. I also, chose to maintain my background solid to create continuity within the blocks.

So, above is my fabric key, I chose to work with Terrace Main in orange cream, Bouquet in sprout, and Rosebed in Pomegranate. All of these fabrics are from Juliana Horner’s 2013 Rosette line, designed and sold exclusively at JoAnn’s Fabrics (which makes it really accessible when you live in a town without amazing modern fabric shops.) When I purchased my fabrics, back in June/July, I purchased 9 of the 12 prints in the line, there were a few I just didn’t love to pieces at the time. But now, I am really wishing I had purchased those other prints so I could have the full collection, unfortunately those three have sold out at my local JoAnn’s, and they don’t seem to be bringing them back. They are available online, but only in full yard cuts and I really only want half yards, so I’m on the fence about ordering them. But I will mention, that Juliana Horner has already introduced some new fabrics at JoAnn’s in November. I went ahead and snatched up a half yard of each of those too, and am in love with the colors and prints, but that’s for another post.

So here she is, a little unconventional as far as color combination, but I think actually quite lovely.  This was a challenging block to match seams on, and I think I could actually create it with greater success, if I re-organized how the blocks are pieced. But I won’t, because I am overall pretty happy with the outcome.

A few photos to swoon over…

And an updated photo of all 8 completed blocks, thus far. Not too shabby!

The plan is for 12 total blocks, so we are already 2/3 finished with the blocks.

However, I finally purchased the book, and I think I might just make up a few more blocks, maybe an extra four, so it is a 16 block, or even an extra 8 so that it is a 20 block… There are just so many blocks in the book that I want to try, and where better to put them than in a sampler quilt! (There are by the way, 99 blocks in the book, but I won’t be making them all, for this quilt at least!

So, why not pop over to the Linky party to see what the other quilt a long participants are whipping up this month! Also, be sure to return tomorrow for a very special post also related to the Modern Blocks Quilt a Long, which I know some of you have been asking about!

xo,

Erin Myone

Okay, I’ve been sitting on this post for well over a week because it took me that long to scan my fabric key, but here it is folks! The November block in the Modern Block Quilt A Long hosted by And Sew We Craft. This month’s block is the Pogo Stick block chosen and instructed by Rosalyn of Sew Delicious. As a reminder, all of the blocks completed for this quilt a long are from the book Modern Blocks by Susanne Woods, which I finally purchased from Joann’s this week with my Veterans Day coupon. But you can find the book almost anywhere online, Amazon, Book Depository, etc.

Above is an image of Rosalyn’s block, and  you can find her tutorial for the Pogo Stick  block here. So every time I piece a block for this quilt a long, I always take a look at how the tutorial host has put it together, and also how Amy at And Sew We Craft has put her’s together. Viewing the other blocks really helps me make decisions about my own block, and as I didn’t own the book until now, I can only assume that they pieced their block pretty similarly to what is in the book.  In this case, they both pieced the foreground element in one print and the background either as a solid or a separate print.

Which, I think looks lovely on both ladies’ blocks, but two things occurred to me while I was deciding how I wanted to arrange my block. First, the block is called pogo stick, so what part of the pogo stick are we looking at here? Second, how can I use more than one print in my block, but also retain the solid background fabric that I have used throughout all of the others? So I decided to break the block into a few different elements of the so called “pogo” I separated the square from the side pegs and then separated the center pole and arranged my fabrics from lightest to darkest in an attempt to create depth. So my pieces looked more like this:

I kept my off white background fabric, then chose Posy Navy for the side pegs, Bouquet Sprout for the square, and Garden Main Floral for the vertical pole. All of my fabrics for the entire Modern Blocks quilt a long are from Juliana Horner’s 2013, Rosette fabric line designed for JoAnn’s Fabrics.

Now the question becomes, was I happy with my deviation from the two reference blocks? Yes, yes I am very happy! I actually love the outcome of the Pogo Stick Block. It was so simple to piece, yet came to be such an awesome modern graphic composition! This is one block I can definitely picture as an entire quilt! And with a little google searching, you will see that others agree, there are numerous full Pogo Stick quilts out there and maybe someday soon I will have made one of them!

Be sure to head over to the Linky Party at And Sew We Craft to view the other quilter’s Pogo Stick blocks! I really enjoy seeing the little twist everyone puts into their own blocks, and this month there is plenty of variation!

Happy Hopping!

Erin Myone

Well, I am at it again! I have just started another quilt a long. This time it is the Lighthouse quilt a long hosted by Faith of Fresh Lemons Modern Quilts. Faith has done such an amazing job so far detailing all of the fabric, batting, and template requirements for all different sizes of quilts. The math that she has put into this has literally blown my mind! I cannot be more thankful that she has taken the time to spell it all out for us!

So this past week was the test block week. I chose some fabrics from my stash, a few Denyse Schmidt prints that I had previously purchased from JoAnn’s Fabrics which I paired with Kona Bone. Here is my handy dandy fabric key, this time I sewed a scrappy dresden piece for the fun of it… (Dresden refers to the shape, typically you put a bunch of these “petals” together to make a lovely flower like shape with either round or pointed edges.)

So, the block itself is paper-pieced. Which is pretty easypeasy anyway, but I have a few tips to add to Faith’s excellent instructions.

First, I like to mark a 1/4″ seam allowance so that I have a line to align with the raw edges of my fabric, rather than eyeballing my seam allowance based on the stitch line that is already printed on the pattern.

From this point, I can easily align my fabrics and be certain I have a 1/4″ seam allowance. But I also have another trick before we do that! I lay my fabric out on a ruled cutting mat so that I can also be certain that my fabrics are centered.

In this case, I centered the 2 1/2″ print on top of the 4 1/2″ solid fabric –leaving me 1″ of solid fabric on each side of the printed fabric. Then I place the paper template and as you can see below, the newly marked 1/4″ seam allowance aligns perfectly with the raw edges of the perfectly aligned fabrics!

Now I am ready to stitch along the seam-line which was already diagrammed into the paper template! Bada-bam!

But, there is more! I have one more tip to share with you to further perfect our paper-piecing! Now that we can perfectly align the seam allowance and seam-line, we might also want to know that the paper template is centered on the fabric. This, my friends, is much much easier when you mark the center line on the paper template.

Now, combined with the ruled cutting mat and our carefully centered and aligned fabric, we are able to perfectly align the paper template to get the very best paper-pieced pattern EVER! OCD? Maybe, but isn’t that what paper-piecing is all about? (Don’t get confused, I am now using the second piece of the template.)

Okay, so if you’ve never paper-pieced before you do get to a point where you have this little mess.

Which is my least favorite thing about paper-piecing. It just seems so wasteful… So I’m going to ponder ways that I can reduce the waste produced when piecing my quilt blocks… Speaking of which, I bet you would like to see the finished test block!

TA-DA!

(Sorry for the fuzzy picture, I am working in our basement which doesn’t have the best light and as we roll into winter, I am certain I will be taking more and more photos in dimly lit settings! :S )

Check it out! Isn’t she beautiful? I know…

I do plan to construct an entire quilt but, my fabrics haven’t arrived yet, and I am going to be piecing a very special quilt for a very special project which I will tell you more about very soon! If you would like to participate in the Lighthouse quilt a long, be sure to visit Faith’s blog (the link is posted at the top of this post), to find the template and piecing instructions, as well as all of the wonderful calculations! And of course, share your progress on instagram, flicker or whatever platform you use!

xo,

Erin Myone

Hi friends!

This month the Modern Blocks Quilt-a-long prize is going to be vote based rather than a random drawing. The prize this month is a: Fat Quarter Bundle of Cypress Acacia by Tula Pink for Free Spirit Fabrics. I sure would like to win, so if you don’t mind head on over to And Sew We Craft Block 6, scroll all the way to the bottom of the post and click on “Like” beneath block #2 by CollectCreateCirculate.com (which is my blog title). My block is pictured in this post, so just look for that on their website and click “Like” beneath it!
Don’t worry, you won’t receive a bunch of crazy emails for liking my block, your “like” is just one more vote for me to win some awesome fabric!

Recently I have been getting whipped by another block, so it’s time for a come back. I can only win this with your help! Show me the love! There are eleven days left to vote, and each day as my votes increase, so does the other block’s and somehow she always stays about 8 votes ahead. So if you can go back to the website a few times! You can only vote once a day from the same ip address, so I could use help from supporters of this blog to make up the difference!

Please, please, please, don’t make me beg! I would love to do some fun projects with the Cypress Acacia fabrics and share it here for all of you to see!

xo,

Erin Myone

And she’s on a roll!  And by “she” I mean me! The ladies of And Sew We Craft posted the October block yesterday! They are in Australia, so for them it was right on time (10/01), and for me in the Midwest United States it was a day early (9/30)– which was fine by me! This month’s block is the Best Friends block, it was hosted by Anorina over at the blog Samelia’s Mum. She gave a little background on the block, apparently the original designer is Angela Pingle who runs the blog Cut to Pieces. I have never come across Cut to Pieces, so I am excited to have another crafty blog to check out.

Above is Anorina’s block, she used a directional print so she utilized some special cutting instructions so that her elephants all run the same direction. Her tutorial for the October Best Friends block is here!

Amy at And Sew We Craft shared her Best Friend block in this month’s Modern Block Quilt a Long Introduction Post. She also cut her pieces with a directional print, and even fussy cut the adorable center piece to align the hula hoop girl!

I love what they both did with their directional prints, but In order to keep with my theme, I also wanted to maintain a similar use of my background fabric, so I cut the larger rectangles from my neutral solid. I was somewhat bummed to leave so much of the block blank when everyone else is employing such awesome prints for their blocks, but really this meshes better with my other blocks.

 Again, I used Juliana Horner’s 2013 Rosette fabric line which is sold exclusively at JoAnn’s Fabrics, which by the way I am in love with. It is so sweet with it’s blend of traditional and modern motifs and colors. This month I made it back to JoAnn’s and found another print (Ivy Tangerine) that had apparently arrived late at my local store, so of course I had to buy it and introduce it into my blocks!

So, the block construction was easy-peasy. It does include a partial seam, but really it isn’t difficult and from the front you can’t even tell which seam was the partial seam!

And since we are six months into the quilt a long, I decided to post a photo of all six blocks that I have completed so far! Half way there!

Are you working on any quilts right now? Did you join the Modern Blocks Quilt a Long? Let me know what you are up to in the comments!

xo,

Erin Myone